Prepping basics: How to make and use slingshots
Monday, July 15, 2019 by Zoey Sky
http://www.bugout.news/2019-07-15-how-to-make-and-use-slingshots.html
Slingshots are often associated with young children playing pranks. But with enough practice, preppers can turn simple slingshots into powerful self-defense and hunting weapons. (h/t to UrbanSurvivalSite.com)
Old-fashioned slingshots were usually made with rubber inner tubes secured to sturdy Y-shaped pieces of wood. After World War II, they became more popular as commercially manufactured slingshots were offered in stores.
Manufactured slingshots like the Wrist Rocket elevated the slingshot from being a toy to a legitimate hunting weapon.
Making your own slingshot
DIY slingshots made with surgical tubing instead of rubber inner tubes have greater accuracy and inertia. Small ball bearings also surged in popularity as ammunition. (Related: 5 Everyday items you can use to protect yourself in a dangerous situation.)
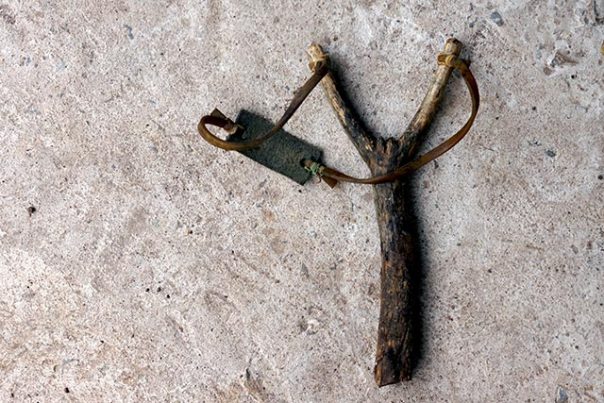
The design of homemade and manufactured slingshots have the same basic characteristics. Slingshots have a forked branch that’s used as a handle, with two uprights in a Y-shape that holds an elastic band attached to a pouch that launches your ammo.
Tools:
- A tree saw
- A sharp knife
- Pliers for twisting wire (optional)
- Kitchen shears
Materials:
Two uprights that form a gap to hold the elastic bands. The uprights must be set far apart so you can easily launch your ammo.
Find a tree branch that creates a fork. Maple is a popular choice because this wood is hard. Use wood from green trees because they’re stronger than dead wood. Avoid softwoods (e.g., pines), springy woods (e.g., willows), and weaker woods (e.g., boxelder).
Saw the branches into a slingshot shape. Leave the bark on the slingshot, or shave it off if you want a smoother grip. Once you peel the outer bark, hold your knife vertical to the branch then scrape off the green, inner cambium, which is a layer of slippery bark still stuck to the branch.
Dry or season the green wood for your slingshot frame. Carefully roast it over a fire. Alternatively, you can leave the wood as is. In time, the slingshot frame will season itself.
Other materials for your frame include metal or plastic.
- Metal – Metal like aluminum or steel is light and strong, but it’s more expensive than plastic or wood.
- Plastic – There are different plastic sub-types. Do your research to determine which one suits your needs. For example, glass-filled nylon is ideal if you need a lightweight and durable slingshot.
Elastic material
You need a material that will stretch, e.g., strips of rubber inner tubes or surgical tubing, and deliver enough force when released to propel the ammo.
Pouch
The pouch will hold and launch your ammo. Use material like canvas, inner tube, or leather.
Ammo
It is best to use smooth and round projectiles, such as ball bearings or small pebbles. Ball bearings are ideal because they have a consistent size and weight. Ball bearings are also aerodynamic, which can improve your accuracy. Alternatively, you can use marbles.
In an SHTF scenario, you may want to use small pebbles. If you run out of ball bearings, search for small, round stones. Avoid flat rocks or those with angular surfaces. Irregular shapes will affect the aerodynamics of your projectile, which can make you miss your target.
Materials for attaching elastic to the slingshot frame.
Your options include baling wire, dental floss, electrical tape, friction tape, or twine.
Steps for assembling a bundled rubber band slingshot
This type of slingshot is easy to make. Rubber bands don’t have enough firepower as surgical tubing, but they can still propel a stone far enough if you use bundled rubber bands.
- Once your Y-branch is ready, wrap friction tape around the handle for better grip.
- Connect the rubber bands together using three more rubber bands looped over the ends to create a long band for the slingshot.
- Interweave the bundled rubber band with a second set of three-looped bands.
- Take the inner tube or leather for the pouch then punch two holes into either end.
- Push the rubber band ends through the holes and loop to connect the bands to the pouch.
- Twist the end of the bands over the top of one of the tips on the Y-branch.
- Hold the rubber bands in place by wrapping a length of electrical tape around them.
Safety tips when using a slingshot
Slingshots look harmless but like other weapons, you need to learn how to use them properly so you don’t hurt others or damage property.
- Before practicing, make sure there’s nothing in the background – like people, pets, or cars – that can be damaged or hurt by a high-velocity projectile.
- Choose a clear, open area. Trees can make your ammo ricochet.
- If you want to collect your ammo after you’re done practicing, angle a sheet of plywood at 45 degrees behind your target. Alternatively, you can place a tarp on the ground under the plywood to make it easier to find and collect pebbles or ball bearings.
- Tin cans or empty two-liter plastic bottles are ideal targets for practicing with most types of slingshots.
- Prevent misfires by drawing the elastic band back squarely and using ammo that is the right size for your slingshot. Misfires can hurt or break bones in your hand.
- Elastic bands on slingshots will deteriorate with time, so check and replace them as needed. Attach the elastic band properly so it doesn’t snap back and hurt your face.
- Wear protective eye wear when firing a slingshot.
- Use a lighter projectile like acorns or a paint gun pellet if you’re testing a slingshot for the first time.
- Keep your slingshot away from children to avoid accidents.
When SHTF, make a slingshot so you have access to a simple yet effective long-range weapon.
Sources include:
Tagged Under: Tags: bug in, bug out, Collapse, disaster, DIY, how-to, off grid, personal safety, prepping, self-defense, SHTF, slingshots, survival, survival skills, Survival Tips, survival tools, weapons, wilderness survival
RECENT ARTICLES
